Showing posts with label Breads/rolls. Show all posts

Monday, March 28, 2016

Mozzarella Stuffed Garlic Butter Crescent Rolls

Cheesy, buttery and so delicious!

 
My family loves crescent rolls, you know, the ones in the tube from the refrigerated section of the grocery store.  I make them often, just roll and bake.  Once in a while I'll use them for other yummy snacks, like Ham and Cheese Roll-ups, Chicken Pockets or Parmesan Twists.  Seems like they were made just for me to see how many different foods I can make with them.  Haha!

Anyway, I decided to try making them into a cheese bundle, using string cheese, and a buttery garlic sauce.  It was a good choice, and made my Easter dinner go up a notch!  The family gave this a definite thumbs up! 

These take just minutes to put together and are absolutely delicious!

Ingredients:

1 (8oz.)tube crescent rolls
4 string cheeses, cut in half (total 8)
2 tablespoons salted butter
1/2 teaspoon Italian seasoning
1 small clove garlic, minced
 
Preheat oven to 375'F.  Spray a baking sheet with cooking spray or use parchment paper.
 
In a small bowl, melt butter together with Italian seasoning and garlic.
 
Pop open crescent rolls and separate into triangles. Brush the tops with some garlic butter. Place half a string cheese at the wide end and roll up, tucking in the sides as not to lose any cheese while baking.  Brush the tops with more garlic butter and bake 10-12 minutes or until lightly browned.  Serve warm.


Be encouraged!
I say to the Lord, “You are my God.”  Hear my cry for help, Lord! - Psalm 140:6

Sunday, August 30, 2015

Crusty Italian Bread

You won't want store-bought after this!
I rolled out my dough for this batch and made a traditional looking Italian bread.
There is nothing like homemade bread...and Italian bread is the most versatile.  It's great for toast, sandwiches, hoagies, pizza, drizzle olive oil on it or just eat it with some butter.  Totally yummy!

I can't even tell you how good your house will smell when it's baking, too.  My granddaughter came home from work today, and opened the front door to this heavenly aroma.  She literally squealed with excitement, did her happy dance, and exclaimed "Fresh bread!!!"  She makes me laugh!

Sometimes, I make this bread in pans to use for sandwiches.  It shapes up perfectly and makes the best sandwiches!  Seriously, try baking your own bread...you won't regret it!  


Ingredients:
4 1/2 tsp. active dry yeast (or 2 packages)
2 cups warm water (105 to 115 degrees)
1 Tbsp. brown sugar
1 Tbsp. salt
1/4 cup olive oil or vegetable oil
5-6 cups flour

Dissolve yeast in a bowl with warm water; add sugar and stir well.  (Adding the sugar now will help the yeast to work faster and feeds the yeast.) Let stand for a few minutes until it starts to bubble and foam a bit; then add oil.  Mix well.

Stir in 3 cups of the flour and salt; beat until smooth.  (I just used a wooden spoon, it's pretty sticky at this point.)

Now add remaining flour, 1 cup at a time (I used 5 cups total).

At this point, I used my Kitchen Aid mixer with the hook.  This kneaded the dough for me for about 5-8 minutes.  You can do this by hand, on a floured board or counter top.  Knead until smooth and elastic, up to 10 minutes by hand.

Place in a greased bowl; brush top with salad oil.  Cover; let rise in warm place until doubled, about 45 minutes.  (I make a warm place for it by using a heating pad underneath, on low, and covering it with a clean towel.)  
Ready to rise.

And rise, it did!  
Punch down dough and divide it in two and form two loaves by rolling each half into a rectangle, 18x9".  Roll up tightly, beginning at short side, then press each end to seal and fold ends under loaf.

Place seam side down onto a prepared sheet pan.  Brush loaves lightly with oil and let rise again until doubled, about 1 hour. 
Rising nicely...I used the pans today...wanted to make sandwich bread.
Brush the risen loaves with an egg mixture of 1 egg and 1 Tbsp. water and sprinkle generously with sesame seeds, if desired. (I left this step out this time and liked it better.)

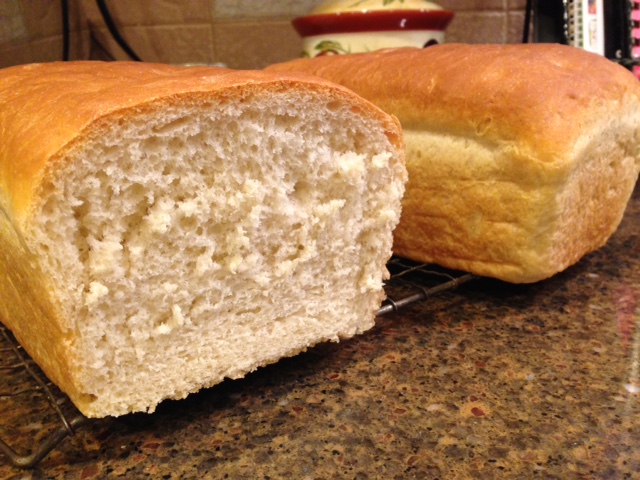
Fresh out of the oven.

These sliced up great, and my husband loved his sandwich on homemade bread!
Bake in preheated 400'F. oven, on lower rack (not the lowest), for about 25-30 minutes or until loaves are golden brown and sound hollow when tapped.
(Check them at 20 minutes, that's all mine took, but every oven is different.)


Be encouraged!
Then Jesus declared, “I am the bread of life. Whoever comes to me will never go hungry, and whoever believes in me will never be thirsty.  -John 6:35


Tuesday, May 12, 2015

Easy Fried Dough (Pizza Fritte)

Pizza Fritte!

This was one of our favorite treats, growing up.  Mom would fry dough for breakfast, lunch or a snack.  I've carried this tradition down to my children and grandchildren, and I know they're going to do the same with their families.  One of the easiest recipes I can give you, actually, not a recipe at all.  Just some simple instructions.

My son loved these so much, that whenever we would go home to visit, my Aunt Helen made sure to have these "in the pan" for him.  I can still see her standing at her stove, while David eagerly waited for his favorite treat.  She would laugh and joke with him, smiling the whole time, because she knew he was practically jumping out of his chair in anticipation.   Precious memories, so precious!

I listed some toppings that you might like, but we always just use the two different sugars. 
You can let your imagination go wild, even dip it in chocolate or Nutella. 

Ingredients:
1 lb. prepared pizza or bread dough 
Vegetable or canola oil for frying
Large frying pan with deep sides

Toppings:
Powdered sugar
Granulated sugar
Cinnamon sugar
Butter
Jam
Honey


Instructions:
Pour about 1" of oil into frying pan, and heat to medium-high.  (See tip below)

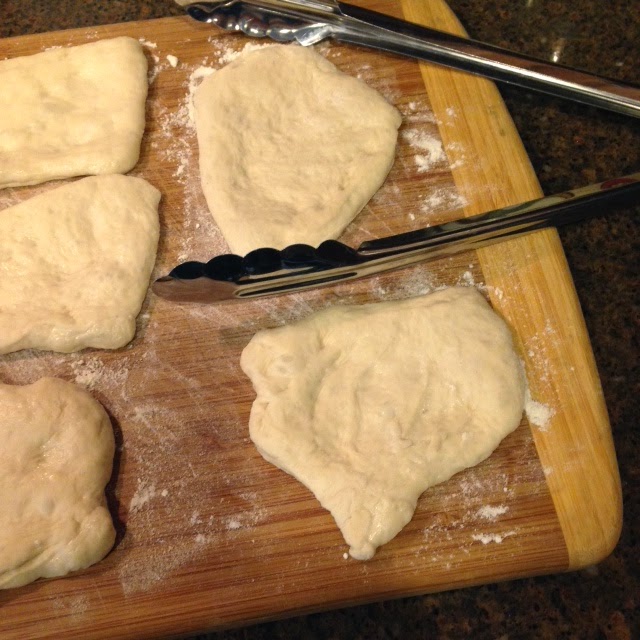
Place dough on floured board and press down to even out a bit.  Cut into 8 equal pieces.  Put a little flour on your hands (so the dough won't stick) and gently stretch out the dough as far as it will go, without ripping it.  

Pieces have set a few minutes, and are ready to fry.
 
Use tongs to keep your fingers away from the hot oil.
 
Carefully place into the hot oil, cook about a minute (goes fast) or until the side down is golden, then turn over and brown the other side.  (Never leave the stove when you're frying something.  I learned the hard way, and burned down my first house. Yeah, true story!) 
 
Underside is starting to get golden brown.
 
Carefully turn them over.


Ready to put on the paper towels to drain off oil.
Ready for the toppings!

Use tongs to remove onto a paper towel or brown paper bag, to drain off any excess oil.
Immediately sprinkle on cinnamon sugar or powdered sugar or spread on some butter, and various other toppings, if desired.  Serve warm.

A Tip from Grammy:
-A tip for knowing when your oil is ready: tear off a tiny piece of bread and when it floats to the top and has bubbly sides it’s ready. You don’t want it sinking to the bottom.

Be encouraged!
Let the words of my mouth and the meditation of my heart be acceptable in your sight, O Lord my strength and my Redeemer.   -Psalm 19:14


Sunday, March 22, 2015

Oven Baked French Toast Casserole

A delicious make-ahead breakfast!


So, yesterday, my granddaughter asked if we could have a nice breakfast before she went to work at her new job.  Of course, I was more than happy to make it for her.  But, since she doesn't like eggs, I decided on one of her favorites, French Toast.   I just wanted to do something a little different than the usual.

Time to search the web...yes, there it was!  Baked French Toast!   Since I never tried it before, I decided to make it anyway and hope for the best.  Well, they all loved it!  Yay! 

This is one of those wonderful "make ahead" breakfasts.  You can put it together the night before, and into the fridge until morning, if you like, I just left it there an hour.  Your family can wake up to the aroma of cinnamon, vanilla and warm maple syrup...all in one magical breakfast casserole!

It rose in the oven like a beautiful soufflé, then when you cut into it, the tops and sides are crunchy and the middle is tender...just like a soufflé!  
 

Now I'm on the lookout for other variations on this dish, and it seems there are plenty.  But, for now I'll share this one because it was such a hit at our family breakfast today.


Ingredients:

1 loaf of French bread
8 eggs
2 cups milk
½ cup heavy cream 
2 Tbsp. vanilla extract
½ tsp cinnamon
1/8 tsp. ground nutmeg
*********************
½ cup butter
1 cup brown sugar
1 tsp. cinnamon
1/4 tsp. salt
3 Tbsp. maple syrup (or honey)
1 cup chopped pecans (optional)

Tear bread into chunks or cut into cubes; evenly lay out in a 9X13 pan. 

Mix eggs, milk, cream, sugar, vanilla, cinnamon and nutmeg together.  Pour over bread.  

Refrigerate for a couple of hours or overnight. 

In morning, preheat oven to 350'F. 

Melt butter and cook with brown sugar and syrup or honey until just boiling.  (If you add the pecans, this will be a wonderful praline topping.)  Pour over bread mixture.

Bake at 350 degrees for 40 to 45 minutes for a soft, moist texture; and 50-60 minutes for a firmer, less moist one.

If top starts to get too brown, cover loosely with aluminum foil.

Enjoy!


When my heart is overwhelmed, lead me to the Rock that is higher than I. - Psalm 61:2

Monday, March 16, 2015

7-Up Biscuits

Just 4 ingredients and oh, so good!


Well, I'm always looking for some quick and easy recipes to share, and I've got to tell you, it just doesn't get any easier than these 7-Up Biscuits.  They are just awesome!

They're the lightest, fluffiest biscuits I've ever made, and the whole family loves when these make an appearance on the dinner table.  

You can even lighten them up with diet soda and light sour cream, if you'd like, and they'll still taste great!  I won't tell anyone either.  Hehe!

These are just too good not to share...or to try!  Make them for your family tonight, they'll be so glad you did!


Ingredients:

4 cups Bisquick
1 cup sour cream,
1 cup 7-Up or Sprite
1/2 cup melted butter

Preheat oven to 425'F.

Mix together, Bisquick, sour cream and 7-Up in large bowl.  Dough will be very soft, but don't worry.

Knead on a lightly floured surface, until just sticks together;  fold and pat dough out onto a floured board.  Cut biscuits with a round cookie cutter.  (If you don't have one, just use an inverted glass.)

Melt butter in bottom of a 9x13" casserole dish.  Place biscuits on top of melted butter,

Bake 12-15 minutes or until tops are golden brown.


"He [Jesus] is before all things, and in him all things hold together." - Colossians 1:17


Tuesday, December 30, 2014

Mini Hawaiian Ham & Cheese Sliders

Irresistible!


Picture from Pinterest


Here's a new recipe I found last year on Pinterest!    Yes, I'm a "pin-aholic".   My kids tease me and tell me I need to find a meeting to help get over my love of pinning.  I guess I'm a closet hoarder with almost 45,000 pins...but, it's okay, since I can do it without a mess.  Messes go against my "neat and clean" obsession.  LOL!

There are a few different recipes for these delicious little sliders, but this one is my favorite.  The slightly sweet, soft, melt-in-your-mouth Hawaiian rolls combined with the little tang of Dijon and Worcestershire sauce is wonderful.  I tried to take a picture of the ones I made, but when I went to get my camera and come back to the kitchen...they were gone!!!   They looked almost identical to this picture, so that's why I "borrowed" it from Pinterest. 

Ingredients :
           
1 pound deli ham shaved
1 pound Swiss cheese thinly sliced
1 stick butter
1 1/2 tablespoons Dijon mustard (honey-mustard is delicious too) 
1 1/2 teaspoons Worcestershire sauce
1 1/2 teaspoons minced onion dried
1 12-pack KING'S HAWAIIAN Original Hawaiian Sweet Dinner Rolls             


Poppy seeds or Sesame seeds

Preparation:
            
Melt butter and mix in mustard, sauce and onion.
Picture from Pinterest

Cut the entire pack of rolls in half, horizontally (keeping all top and bottom halves separately in tact). 

In a foil-lined 9x13 inch pan, spray with Pam, then place bottom half of rolls on top.  Brush with 1/2 the butter mixture and cover with ham and cheese.   Place top half of rolls over this.

Brush the rest of the butter mixture over top of rolls, making sure onion is evenly distributed.                

Refrigerate over night.                

Cover loosely with foil and bake at 325 degrees for approx. 30 minutes.  Once finished, separate with a sharp knife, for serving.


Variations: 

Substitute sesame seeds for the poppy seeds.

Instead of melting the butter, let it get soft and mix all the ingredients into the butter (mustard, Worcestershire, poppy seeds and onions) then spread the tops of the rolls (the inside part) before putting the sandwiches back together before baking. 


"So teach us to number our days, that we may apply our hearts unto wisdom."    -Psalm 90:12
 

Thursday, November 20, 2014

Cheesy Pull-apart Bread


Also known as "Crack Bread"


There are about a million recipes for Pull Apart Bread all over the web, Pinterest and food blogs.  The variations are endless, and depending on your taste, you can really make it fit to your family's preferences.  I found this one on Taste of Home, and made a few adjustments.   I hope you'll make this for your holiday dinner or gathering.  It's a winner!

I tried it for our Italian Christmas dinner a couple of years ago, it couldn't have been better!  My family loves garlic bread, pizza, cheese... all the good stuff.  Hehe! 
 

But, it almost didn't make it to the table!   My kids were helping me put out all the food, and we didn't realize how slippery the bread was on the plate.  Good thing my son-in-law has fast reflexes.  Here's the picture of how Mike saved the bread.  It was pretty funny!   Notice the look of terror on Matt's face...he thought it was a goner.  Ha!

Mike and Matt saving the bread.


Directions:

1 (1 lb) round loaf sourdough bread
6 oz provolone cheese, shredded
6 oz sharp cheddar cheese, shredded
1/2 cup (1 stick) unsalted butter, melted
1 clove garlic, minced

1/2 tsp. granulated garlic or garlic powder
1/8 tsp. onion powder
1/2 tsp. dried Italian seasoning
Chopped fresh parsley, garnish (if desired)


Preheat oven to 375 degrees. Rip off a large enough piece of foil to wrap around the loaf; coat with nonstick spray and place on a baking sheet.

Cut the loaf of bread into 1-inch slices with a serrated knife, leaving about 1/4-inch of the base of the bread intact. Repeat cuts in the opposite direction to create a crosshatch/cubed pattern. Place bread on the foil.

Press the shredded cheese between all the slices of bread.

In a small bowl, whisk together the butter, minced garlic, garlic powder, onion powder, and Italian seasoning. Gently pry apart the bread pieces and drizzle the mixture over the loaf evenly, making sure to get in all the seams and cover all the pieces.

Wrap the bread up in the foil. Bake for 15 minutes.

Open up the foil, increase oven temperature to 425 degrees, and bake another 10 minutes until the cheese is melted and the bread is golden brown.

Let stand 5 minutes before serving, sprinkle with parsley and enjoy!


"Walk with the wise and become wise, for a companion of fools suffers harm."  - Proverbs 13:20


Thursday, October 30, 2014

Cranberry Orange Nut Bread

A great breakfast or snack!

This sweet & tangy bread has been at every Thanksgiving dinner since I got the recipe from an elderly woman when I was a young bride.   I've never forgotten the advice she gave me while making this recipe.  She said, "Never use anything to mix this, except a wooden spoon!"   Now, I didn't understand at the time, but I took her advice, and to this day, I never use anything but a wooden spoon to mix it.   The funny part is...I still don't know why!  Haha!

This was another one of my mother's favorites, and she looked forward to it every year.  She also loved it when I made a filling with cream cheese, crushed pineapple and turned this and pumpkin bread into little sandwiches.  Oh, yum, I'm getting excited for the holidays again!

This is a bread you can make weeks ahead of time and freeze until the big day.  Pumpkin bread is another one of the "make aheads" on my holiday "to do" list!   Baking these ahead of time cuts down on the stress of the week before the event.


Ingredients:

2 cups flour
1 cup sugar
1 1/2 tsp. baking powder
1/2 tsp. baking soda
1 tsp. salt
2 cups cranberries, chopped
1/4 cup shortening or butter
3/4 cup orange juice
1-2 Tbsp. freshly grated orange rind
1 egg, well beaten
1/2 cup chopped walnuts

Preheat oven to 350'F.   Grease a 8 1/2x4 1/2-inch loaf pan.

Sift together flour, sugar, baking powder, baking soda and salt. 

Cut in shortening with a fork, until mixture resembles coarse cornmeal. 

Combine orange juice and rind with egg.

Pour all into dry ingredients, mix with a "wooden spoon" just to dampen.  Don't over mix.

Carefully fold in chopped cranberries and nuts.

Spoon into a greased loaf pan, spreading corners higher than center.

Bake at 350'F. for 1 hour or until toothpick inserted in center comes out clean.


"If God sends us on stony paths, He provides strong shoes."  -Corrie Ten Boom

Saturday, August 16, 2014

Italian Sausage Roll Bread

A great snack...or just because we love it!


Bread...an Italian staple, right next to pasta.  Now take that bread, add sausage, mozzarella, parmesan, seasonings, and you've got something extra special.

My dad made his own sausage, and I've never found any in the store that could compare.  I will say, though, Premio Hot Italian Sausage is very good, and that's the only one I use for making anything using Italian sausage.   We prefer the hot sausage, but the sweet is fine, too. 

Dad also added greens to his sausage bread, escarole was his favorite.  My family prefers it without the escarole, but if you like it, go ahead and add some.  I'll bet spinach would be very good too!

Sausage Filling:
1 lb. hot or sweet Italian sausage (loose, or removed from links and broken up)
1 Tbsp. olive oil
1 Tbsp. garlic, minced
1 tsp. dried parsley
1 small onion, diced
salt & pepper  (Actually, I don't add either. It doesn't need it.)
4 c. shredded Mozzarella cheese
3 Tbsp. grated parmesan (to taste really, add more if you like)
2 (1 lb.) pkgs. of bread dough (or make my Easy Peasy Pizza Crust Dough.  Works great!)
1 egg white (save in a bowl to brush top with before baking)

Directions:
Line a cookie sheet with non-stick foil, set aside
Heat olive oil in a large skillet, add onions, salt, pepper and parsley.  Cook onions until they are translucent, then add the garlic.  Cook the onions until they are caramelized.

Remove the onions to a bowl, leaving extra oil in the pan.
Put the loose sausage into pan and cook until browned, being sure to break it up into small chunks.

Add the onion mixture back into pan with the sausage and cover.  Simmer on low heat for a few minutes, stirring occasionally.  Watch carefully as not to burn.

Preheat oven to 350'F.

Roll out one ball of dough onto a floured surface until it's a 8x14" rectangle.  Not too thin or you'll get holes in the dough.

When the sausage mixture is finished, use a slotted spoon to scoop half of it onto the dough and spread it evenly over the surface.  Save the other half for the second dough.  Cover with a layer of half the shredded mozzarella.
Roll the dough up lengthwise, like a cinnamon roll, and tuck in the ends before you get to the end of the roll, like a burrito.  Pinch the ends together to seal.

Lay it with the flap down on the cookie sheet and brush with egg white.  Cut slits in the top to let steam escape.
Bake in the oven until golden brown, approximately 25-30 minutes.  Let bread rest for 10 minutes before slicing.
 
Repeat with second bread dough or refrigerate it in a plastic bag for later use.

Use your favorite Marinara Sauce for dipping. 

Be encouraged!
"Then Jesus declared, "I am the bread of life. Whoever comes to me will never go hungry, and whoever believes in me will never be thirsty."  -John 6:35


Saturday, August 2, 2014

Banana Chocolate Chip Bread

Yummy!

 This recipe just couldn't get any easier, and who knew adding chocolate chips to Banana Bread was going to be so yummy!  Well, I should have known that...adding chocolate to just about anything makes me happy!  

The basic recipe is just a traditional banana bread, but it takes on a new life once the chocolate is added.  I must say, though, I do love banana bread in any shape or form.
 
The key to good banana bread is to not over-mix the batter. Once the liquid ingredients are added to the dry, mix the batter by hand just until the flour is moistened... for no more than about ten seconds. Too much mixing can cause the final product to be dry, tough or misshapen.
 
Ingredients
1/2 cup butter, melted
1 cup white sugar
2 eggs
1 teaspoon vanilla extract
1 1/2 cups all-purpose flour
1 teaspoon baking soda
1/2 teaspoon salt
1/2 cup sour cream*
3/4 cup chocolate chips (semi-sweet, milk or dark...your choice)
2 medium bananas, mashed
 
Instructions
Preheat oven to 350, grease 9x5 loaf pan.
 
Mix together melted butter and sugar, then add in eggs and vanilla.
 
Whisk together flour, baking soda and salt; then add to butter mixture; stir until just blended.
 
Gently stir in sour cream, bananas and chocolate chips, then spread into loaf pan.
 
Bake at 350 for 50-60 minutes, until baked through.
 
Cool on wire rack in pan for a few minutes, then remove from pan to finish cooling completely before cutting. (I think the waiting is the hardest part of this recipe. LOL!)
 
And that's it!  Easy-peasy!
 
*No sour cream?  No problem!  Pour 1 Tbsp. of vinegar (white) into a measuring cup and add enough milk to make 1 cup.  Stir and use as replacement for the sour cream.  That's exactly what I did today, and it made no difference.


A Tip from Grammy:
-Use brown bananas...that's where all the flavor comes from and will mix better with the batter to make a moist and tender bread.
-Don't use a dark loaf pan! This will retain more heat and lead to a burnt bread.
-Don't overmix the batter. Combine the dry ingredients first, then add the wet by hand and stir only until all ingredients are combined.
-Keep an eye out while it's in the oven. If the top looks like it's getting too browned before the bread is fully baked, cover it with a tent made from aluminum foil.

Be encouraged!
“To forgive is to set a prisoner free and to discover the prisoner was you.”  -Corrie ten Boom

Wednesday, July 30, 2014

Glazed Lemon Blueberry Scones

Perfect for breakfast or brunch, with coffee...or just a sweet treat!

This morning, I attempted to make scones for the first time!   See, you can teach an "old dog, new tricks!"   It does sound rather odd to think, at my age, there's a first for anything.  And now, I have a new obsession in the kitchen.  I'm already planning pumpkin scones for Thanksgiving and Cranberry Orange Scones for Christmas.

Fresh scones are so much better than store bought ones!   They're so fresh, moist and tender...well, there's just no comparison.   I know I use the word "easy" to describe many of my recipes on here, but these are so EASY and taste FANTASTIC!  

I highly encourage you to try making these, but, I do have a one-word warning attached, "Addictive."   A little piece fell off one, so I felt it was my duty to dry "just one bite" and ended up eating the whole thing.  Don't judge...I just couldn't help myself!


Ingredients:

2 cups unbleached flour
2 tsp. baking powder
3 Tbsp. granulated sugar
1/2 tsp. salt
1/2 c. (1 stick) cold butter (cut into small pieces)
1 c. fresh blueberries
zest of 1 lemon, grated fine 
1 c. heavy cream (plus more for the top of scones)
Dash of vanilla (about 1/2 tsp.)

Heat oven to 400'F. 

First, sift the dry ingredients together in a large bowl.

Using 2 forks or your fingers, cut in the butter to coat the pieces with the flour. (I did this by hand).  The mixture should end up looking like coarse crumbs.

Make a well in the center and pour in the heavy cream & lemon zest.  Fold everything together until just mixed; do not over work the dough or the scones will be tough.  Gently, fold the blueberries into the dough, taking care not to mash them.

Press the dough onto a lightly floured surface and form into a rectangle. (Don't use a rolling pin, it will smash the berries.)  Cut the rectangle in half then cut the pieces into half again, giving you 4 squares. Cut the squares in half on a diagonal to give you a triangle shape.  Makes 8.

Mix together a small amount of heavy cream and a dash of vanilla.  Brush the tops of the scones and sprinkle with a little sugar.

Place scones on an ungreased baking sheet and bake at 400'F until golden brown and the blueberries have burst, about 15-20 minutes.  Let cool a bit before you apply the glaze.


Lemon Glaze:

1 cup Confectioner's sugar
3-5 Tbsp. lemon juice (add 1 Tbsp. at a time)

Mix the confectioner's sugar and lemon juice (1 Tbsp. at a time) until the desired consistency.  Whisk the glaze until all lumps are out, and drizzle over cooled scones.

You'll never buy scones again!


"The greatest blessing in the whole world is being a blessing!"  J
ack Hyles


Friday, July 25, 2014

Quick & Tasty Dinner Rolls

Ready in 60 Minutes

Nothing smells better than bread baking in the oven, the aroma is unmistakable and irresistible!   But baking bread needs planning, it just isn't something you can do on the spur of the moment...until now!

From start to finish, these rolls are quick to make (about an hour) and tasty to eat.  These are the perfect rolls for those nights when you want dinner ready and on the table in an hour, and no one will ever guess that they didn’t take you hours of kneading, rising, and prep. 


Ingredients:                       

1/4 c. low fat milk
2 Tbsp. granulated sugar
1/4 c. softened butter, divided
3 1/2 tsp. dry active yeast
3/4 c. warm water (105F-115F)
2 1/2-3 c. all-purpose flour
1/2 tsp. salt

Grease a 12 cup muffin tin; set aside.     

In a small saucepan, stir milk, sugar, and 2 Tbsp.. butter together.  Heat on low, just until butter melts and sugar dissolves.  Cool to about 100F-105F.

Pour milk mixture into the bowl of a stand mixer.

Add the yeast and warm water.  Let stand for 5-10 minutes or until yeast is foamy.

Add 2 cups flour and salt to yeast mixture.  Using a dough hook, mix on low speed for about 1 minute.

With the mixer still going, add remaining flour, 1/2 cup at a time.  Mix about 1 1/2 minutes, or until dough starts to clean the sides of the bowl.

Knead on low speed for about 2 more minutes, or until dough is smooth and elastic - the dough will still be slightly sticky to the touch.

Place dough in greased bowl, turning it to grease the top.  Cover the dough with a clean dish towel.

Let it rise in a warm place, free from draft, for about 15 minutes.

Turn the dough onto a lightly floured surface, and divide into 12 equal pieces.

Form each piece into a ball and cut each ball into thirds.

Place 3 dough balls in each muffin cup.

Cover the muffin pan with the dish towel, and let the dough rise for about 15 minutes.

Melt remaining 2 Tsp. butter.  Set aside.

Bake at 425'F for 9-12 minutes, or until the rolls are golden brown.

Brush rolls with melted butter.

Remove from pans, and cool slightly on wire racks before serving.

A Tip from Grammy: 
Here's a secret!  Your dough will rise faster if you place the bowl it's in on a heating pad (low-medium setting).  It's another time saver, and really works great!


Be encouraged! 
"Then Jesus declared, “I am the bread of life. Whoever comes to me will never go hungry, and whoever believes in me will never be thirsty."    -John 6:35