Thursday, December 11, 2014

Chocolate Cookies

Mom's fudgy, delicious little bonbons!

It just wouldn't be Christmas without my mom's fudgy, chocolate cookies.  As a child, I looked forward to these all year long.  Now, I think of Mom with every cookie I roll.  One year, I just made them like a drop cookie and it just wasn't the same to me.  I mean, they tasted the same, but the memory of my mom is still so vivid, even after all these years, that I just had to go back to rolling each one.
I cut this recipe in half because it still makes around 70-75 cookies...that's a lot of cookies!   I also went through and took note of the measurements, since my mom's recipe says "a bag of this" and "add flour until you can roll them", etc.  You get the picture!  Haha!

Ingredients:
1 cup oil
1 cup sugar
1/2 cup Hershey's Unsweetened Cocoa
1/2 tsp. vanilla
dash of salt
1 egg
1 cup milk
1 cup mini chocolate chips (Mom used regular, but minis actually work better)
1/2 cup finely chopped walnuts (totally optional)
Mix together until blended. 

Add:
3 1/2 - 4 cups flour (I add 1 cup at a time)
1 Tbsp. baking powder (add with 1st cup of flour)

When dough thickens to a soft, but firm enough to roll, roll into small 1 1/2-2" balls.  They will rise in the oven.

Preheat oven to 350'F.  Bake about 5-8 minutes, checking a cookie to see if it's done after 5 minutes.  Do not over-bake!  You'll end up with very dry, unappealing cookies. 


When cooled, frost with a white and chocolate glaze and dust with colorful sprinkles.

Chocolate Butter Frosting:

1 ½ cups powdered sugar
 cup cocoa powder
2 Tbsp. butter (softened)
3 to 4 tablespoons milk 
teaspoons vanilla extract
While the cookies cool, make the chocolate glaze by whisking together powdered sugar and cocoa powder. (You can also sift the two together to ensure there are no lumps.)
Add the butter, milk (or water) and vanilla extract and whisk until smooth. Start with less liquid and add more as needed.
Spoon glaze over cookies and garnish with holiday sprinkles or sprinkle with powdered sugar if desired.
Vanilla Butter Frosting:
2 Tbsp. soft butter1 1/2 c. confectioners' sugar3/4 tsp. vanilla extract1-2 Tbsp. milk

Blend butter and sugar.  Stir in vanilla and milk;  beat until frosting is smooth and of spreading consistency. 

Frost cooled cookies and get ready for a real treat!  

Be encouraged!
"So they went with haste, and they found Mary and Joseph, and the Babe lying in a manger."  -Luke 2:16


Wednesday, December 10, 2014

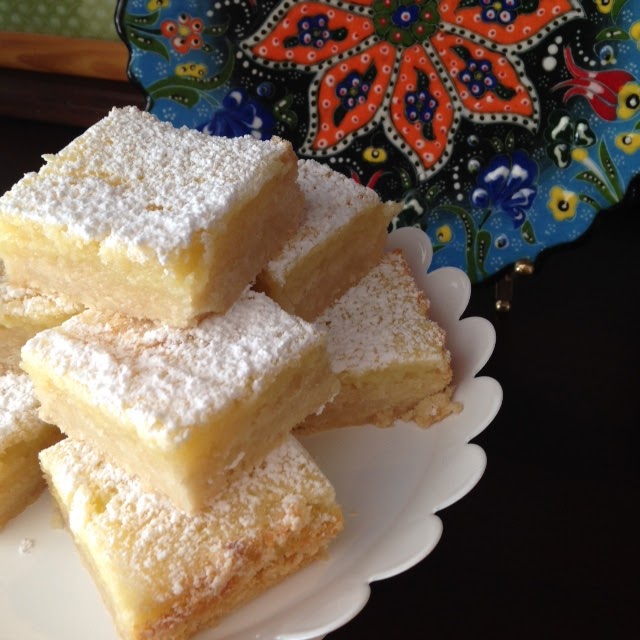
Lemon-Butter Snowbars

Luscious!

I love this recipe!  They turn out great every time, and the flavor is light, sweet, slightly tart...and super delicious!  I've made them for many occasions, for friends or "just because!"

I've had this recipe for so long, I'm not even sure where I got it.  I thought it was in my old Betty Crocker cookbook, but it's not there.  Just on a card in my recipe box.  

My family has been known to literally chase each other around the house for the last one!  All in fun, but still pretty amazing reception for such an old "go-to" cookie!  They're great any time of the year, but I've included them on my Christmas cookie tray forever. 

Warning!  If you make them early, freeze them, or they won't make it 'til Christmas!   Mine are already in the freezer, uncut.  They keep really well and, if uncut, I can tell if someone has been sneaking them!   Yes, I have got to watch this crew when it comes to these lemon bars.  You will too!  Ha!


Crust:
1/2 cup butter
1 1/3 cup flour
1/4 cup sugar

Filling:
2 eggs
3/4 cup sugar
2 Tbsp. flour
1/4 tsp. baking powder
3 Tbsp. lemon juice (Real Lemon is fine)

Confectioner's sugar for dusting top

Directions:

Preheat oven to 350'F.

In mixing bowl, combine all crust ingredients.  Mix on low speed until blended, and will stick together when pressed.

Pat crust into a greased (I use Pam) 8" square pan.  Build up the sides about 1/2" around pan.  Bake near the center of the oven for 12-14 minutes or until edges turn lightly browned.

Meanwhile, prepare filling by whisking all filling ingredients together.  When crust is ready, pour the filling over it while still hot, and return to the oven for about 20 minutes or until set.  I run a sharp knife all around the edges before it cools off to loosen it up. 

Dust with confectioner's sugar, and let cool completely.  Cut into squares.  You may want to dust them again...I do!

If you have "lemon-lovers" in you house, like I do, just double the recipe! 

Be encouraged!
"Therefore the Lord himself will give you a sign:  Behold the virgin will conceive give birth to a son, and call him Immanuel."    -Isaiah 7:14

Monday, December 8, 2014

Chocolate Cream Cheese Drops

Chocolate, cream cheese, cherries, oh my!
 
I'm really not sure where this recipe came from, but I know I've had it for a really long time.  When I originally made them, it was for the kids' "after school" snack...and they were still in elementary school.  Considering my youngest just became a grandfather, I'd say we're going back a few years. 

Anyway, they were so good, that when Christmas came around, I added a cherry or pecan on top and made them a bit smaller, then added them to the Holiday Cookie Tray.   They've been included every year since then.

I've searched everywhere for an updated version of this cookie, but can't even find the original.  So here's where I think it would be fun to use our culinary imaginations and try adding goodies to them.  Mini chocolate chips?  Chopped cherries into the dough?  A cream cheese  or chocolate frosting drizzled over them?   How about a hint of almond flavor along with the vanilla?  Okay, I'm getting myself all excited to make these and "play" with the dough.  Hope you do too!

Ingredients:

1/2 c. butter
1/2 c. shortening
4 oz. cream cheese
1 1/2 c. granulated sugar

Cream butter, shortening, cream cheese and sugar with electric mixer until blended and fluffy.

Add:
1 egg, well beaten
2 Tbsp. milk
1/2 tsp. vanilla
2 oz. melted unsweetened chocolate

Combine well with butter mixture.

Add:
2 1/4 c. flour
1/2 tsp. baking powder
1/2 tsp. salt
1/2 c. chopped walnut (opt) *Psst... I've never added the nuts.

Mix well and drop by teaspoonfuls on lightly greased baking sheet. 

Cut cherries in halves as you go, so you can judge how many you'll need.  Press 1/2 of Maraschino cherry into centers or a pecan, if desired.

Bake at 350'F. for 8-10 minutes.


“Glory to God in the highest, and on earth peace among those with whom he is pleased!”  -John 2:14


Sunday, December 7, 2014

Butterball Cookies

A holiday classic, so easy and so delicious!


This is one of those cookies that just helps make Christmas memories.  I made them with my mom and have continued the tradition in her honor.  She just loved these and I know she'd be thrilled to know they are her great-granddaughter's favorite too! 

I've seen a variety of recipes, some use granulated sugar, some confectioners', walnuts and pecans to toasted hazelnuts, but all use lots of butter! They also have a variety of names, Snowballs, Russian Tea Cakes, Mexican Wedding Cakes and, well, you get the picture. 

Take note!  These are not dietetic!  Just thought I'd throw that out there, in case you were wondering. Hehe!

Ingredients:
2 1/4 cups all purpose flour
1/4 teaspoon salt
1 cup (2 sticks) butter, room temperature
1/2 cup powdered sugar, plus more for coating cookies
1 teaspoon vanilla extract
3/4 cup finely chopped walnuts or pecans
Powdered sugar

Preheat oven to 375°F. 

Sift flour and salt together in small bowl; set aside. 

Using electric mixer, cream butter in large bowl until light.   Gradually add 1/2 cup sugar and beat until fluffy; add vanilla and chopped nuts.

Mix in dry ingredients until dough holds together.
           
Form dough into 1-inch balls. Space 1 inch apart on ungreased cookie sheet.

Bake until just firm to touch, about 10 minutes. (The bottoms will be golden brown)

Transfer to rack and cool slightly. Roll in powdered sugar. Cool completely. Roll cookies in powdered sugar again.  

Store in airtight container.

Yields: Approx. 40 cookies

Be encouraged!
And the angel said to them, “Fear not, for behold, I bring you good news of great joy that will be for all the people.   -John 2:10


Friday, December 5, 2014

Italian Biscotti Cookies


The perfect holiday cookie!

Decorated for Christmas
This isn't your traditional Biscotti, which means "twice baked."  I actually don't know why these are even called Biscotti, but that's what the lady from Italy called them, when she gave me the recipe. 

When I made them for my mom and the family, it became a favorite with everyone, and still is for my granddaughter. 

Overall, the cookies are light on both sugar and shortening, but the glaze and sprinkles add just the right amount of delicate sweetness.  These cookies are delicious with a cup of tea or coffee and are a great way to celebrate any special occasion.  They also freeze well, glaze and sprinkles included!  

This recipe makes a lot of cookies, depending on how big you make them, so you can cut it in half.  Make sure your twists are on the small side, they will expand in the oven. 

Ingredients:
4 cups flour
1 tsp. salt
6 tsp. baking powder
1 cup sugar
8 Tbsp. shortening
4 eggs
1 cup milk
1 tsp. vanilla

Preheat oven to 375'F. 

Mix together, flour, salt, baking powder and sugar in a large bowl. 

Cut in with a fork, 8 Tbsp. shortening (like for pie crust)

Mix together; 4 eggs, 1 cup milk and 1 tsp. vanilla.  Add to mixture and mix well.

Dough will be sticky, so add enough flour to handle, but not too much or it will dry out.

Slice off a strip of dough and roll into a long rope about the thickness of a pencil. Cut the ropes into 4 inch lengths and twist around just once. 

Place on a lightly greased cookie sheet. 
Cookies can also be made by rolling a rounded tablespoon into a ball or shaping ropes into a circle and pressing the ends together.

Bake for approximately 10 – 12 minutes (depends on the size of your cookie) until the cookie is just lightly browned on the edges. Cool for two minutes in the pan and then remove the cookies to a wire rack to cool completely.

Glaze:
1 box confectioner’s sugar (approx. 3 cups), sifted
Approx. 6 Tbsp. milk or water
2 tsp. vanilla extract
nonpareil sprinkles (optional) 


Make glaze adding the water or milk a little at a time until it is a good consistency. Glaze should be slightly “runny”. 

 Once cooled, grasp a cookie and dunk the top portion into the glaze, allowing the glaze to drip off before returning the cookie to the wire rack. 

Add sprinkles and let the glaze dry completely before stacking or storing the cookies. These cookies freeze well.  I've also divided the glaze and used food coloring to make different colored glaze...they looked so beautiful.  I wish I had taken a picture of them for you.

Bake 375'F. for 8-10 minutes or until just lightly browned on bottom.


Be encouraged!
"And she (Mary) gave birth to her firstborn son and wrapped him in swaddling cloths and laid him in a manger, because there was no place for them in the inn."   -John 2:7


Wednesday, December 3, 2014

Holiday Horns

Light, slightly sweet and delicious!

When I mentioned to my husband, that I wanted to post my twelve favorite Christmas cookie recipes, he made sure I included this one.   It's also his favorite!  

Oh, and he wasn't shy about reminding me that I didn't make these for him last year.   I was so sure that I had made them, that I checked the pictures from last year just to prove it to him, but...no Holiday Horns!   That cookie tray was blatantly devoid of his favorite cookie.  He was right (I hate that!)   And yes, I felt guilty, so now I'm going to have to be sure they're on this year's cookie list.
 
This recipe makes a tender, mildly sweet and nutty cookie that is delicious alone or with a cup of tea or coffee!   It begins with a yeast, sour cream dough that does not have any sugar. The ground walnut meringue filling is just sweet enough to balance the dough, and the meringue rises and fills the cookie as it bakes so it is important to roll the dough loosely to allow the meringue room to grow.


Ingredients:
4 cups flour
2 1/4 tsp. dry yeast or 1 yeast cake
1 1/2 cups shortening
4 egg yolks, beaten (reserve egg whites)
1 cup. sour cream

Combine all ingredients and mix well until blended into a soft but firm dough.

Filling:
2 cups walnuts, chopped finely
4 egg whites
1 cup sugar
1 tsp. vanilla

Beat egg whites to a soft peak, then slowly add sugar beaters on the whole time.   Fold in vanilla and nuts.

Preheat oven to 375'F.

Sprinkle work surface with flour. Lightly flatten dough, divide into 6 parts and roll each into a ball. Keep remaining balls of dough covered with a clean dish towel.

Dust your surface with flour for the bottom of your dough.   Use confectioner's sugar for the top of your dough.  Roll the first ball into about a 9" circle. (The powdered sugar on top will keep the dough from getting too tough.)   Cut into 8 wedges, like a pizza.

Spread a heaping teaspoon of filling over the widest 1/2 of each wedge and roll up starting at the widest part to the point.  Bend corners of the cookie to the middle to achieve a nice crescent shape, and place on ungreased cookie sheet.

Bake about 12-15 minutes or until light brown.  Repeat with remaining dough. 

Each ball will yield 8 cookies.

Cool and sprinkle with confectioner's sugar. 


Be encouraged!
"For unto you is born this day in the city of David a Savior, who is Christ the Lord."  -John 2:11


Tuesday, December 2, 2014

Pacific Lime Mold

aka "The Green Stuff"...

I've had this recipe for so long that I don't even know how far back it goes!   This type of jello mold was so popular in the 60's, and that was because they were easy to make and tasted delicious!

I just remember that once I made this one, it became a Christmas classic in our house.  Even my mom would ask me to be sure to make this for the holidays.  She was a big fan!

When Mike, my son-in-law, became part of our family, this is the dish he makes sure will be on the Christmas menu, now.   Only, he likes to call it "The Green Stuff"...so, that's what we nicknamed it!

This is a little healthier than some other gelatin salads, as it has cottage cheese in it, and a little horseradish, if you like that too.  I leave it out, since my husband is the only one who likes it.  

I have a wreath mold, which makes it look really pretty on the table, especially once I decorate it with cherries. You don't have to add the cherries, but for Christmas they just work!  If you don't have a wreath mold, I'm sure you can use a round stainless steel bowl and decorate that too. This is also great to make the day before, a real time saver in the kitchen on Christmas Day.

Ingredients:
1 (3 oz.) pkg. lime gelatin
1 cup boiling water
1 (9 oz.) can crushed pineapple (reserve juice)
1 cup. small curd cottage cheese
1 tsp. horseradish (optional)
1/2 cup heavy cream (whipped)
1/4 cup chopped nuts

Dissolve lime gelatin in boiling water; add juice from can of crushed pineapple.  Chill in refrigerator until SLIGHTLY thickened.  (Do not let it set).

Beat until frothy; fold in pineapple, cottage cheese, horseradish, whipped heavy cream and chopped nuts.  Pour into your favorite mold and chill in refrigerator until firm (overnight is good.)

Chill a plate or tray in the refrigerator for about 15 minutes. Press the gelatin gently to check for firmness; it should spring back easily.  If it doesn't, chill it in the refrigerator until it firms.

Fill a bowl or pan with enough warm water to reach to the top of the mold but not over it.  Use a bowl for individual molds and a pan for tray-style molds.

Dip the exterior of the mold in the warm water for 10 seconds. Remove the mold from the water and shake it slightly to make sure the mold has loosened.

Place the chilled plate on top of the mold. Invert the mold and the chilled plate -- one hand on top of the plate and the other under the mold -- and set them on the work surface.  Gently pull the mold away from the gelatin.
 
 
Be encouraged!
"Love the Lord, your God with all your heart, and with all your soul, and with all your strength."   -Deuteronomy  6:5


Monday, December 1, 2014

Oatmeal Cookies with White Chocolate Chips & Dried Cranberries

My new favorite Christmas cookie!
Photo from the Gold Medal Flour website


I came across this recipe on the Gold Medal Flour website a couple of years ago, while looking to expand my already  obnoxious amount of cookies for the Christmas Cookie Tray.  The combination of flavors was right up my alley, so I had to bake them...right?

So glad I did...they are a great addition to the tray, and freeze well, so I can make them a few weeks before the holidays.  They defrost quickly and taste like you just made them...a great time-saver!


Ingredients:
1/2 cup (1 stick) butter, softened               
1/3 cup. granulated sugar
1/3 cup light brown sugar, packed
1 large egg
1 tsp. vanilla
1 cup flour
1 cup rolled oats (not instant)
1/2 tsp. baking soda
1/2 tsp. cinnamon
1/2 tsp. salt
1 cup white chocolate chips
1/2 cup. dried cranberries 
1/2 cup chopped macadamia nuts

Beat the butter, granulated sugar and light brown sugar in the bowl of an electric mixer on medium speed until fluffy. Add the egg and vanilla and beat until combined.

Add flour, oats, baking soda, cinnamon and salt and beat until just combined. Stir in the white chocolate chips, dried cranberries and chopped macadamia nuts.  Refrigerate dough for 30 minutes.

Meanwhile, preheat the oven to 350°F.   Scoop rounded tablespoons of dough and roll into balls. Arrange on parchment-lined baking sheets about 2 inches apart.

Bake until golden on the bottom, 12-15 minutes.

Cool on the baking sheets for 10 minutes then transfer to wire racks to cool completely.

This only yields about 2 dozen cookies.  But, I make them smaller for the cookie tray and can get up to 3 dozen.  If you do this, bake for 8-10 minutes!  Just a hint - I always under-bake cookies so they are soft and moist.


Be encouraged!
A voice of one calling: "In the desert prepare the way for the LORD; make straight in the wilderness a highway for our God. "   -Isaiah 40:3


Friday, November 28, 2014

Classic Chicken Pot Pie

Who doesn't love Chicken Pot Pie?


Let's face it, this is just about everyone's idea of "comfort food".  I know it's one of my favorites!

This is an excellent recipe and one that's easy to make.  You can even make it more simple by buying a prepared pie crust from your local grocery store.  It's a great way to use leftover chicken or turkey.  I also love using Rotisserie chicken because it adds extra flavor and is always to tender.

My granddaughter's husband said he wasn't a fan of pot pie, but he would taste it anyway.  Yay, a convert!   He loved it, and is looking forward to it again.  Guess I'm going to have to make this soon!

Since I'm posting on the day after Thanksgiving, this is a great way to use up some of that leftover Turkey.  Just substitute it for the chicken and "Viola!"  Turkey Pot Pie.

Hmmm...I just might do that myself tonight!  Hehe!


Crust:
2 cups all-purpose
1 tsp. salt
2/3 cup plus 2 Tbsp. shortening
4-6 Tbsp. cold water

Filling:
1/3 cup butter
1/3 cup chopped onion
1/3 cup all-purpose flour
1/2 tsp. salt
1/4 tsp. pepper
1 3/4 cups chicken broth (from 32 oz. carton)
1/2 cup milk
2 1/2 cups shredded cooked chicken or turkey
2 cups frozen mixed vegetables, thawed
3 med. potatoes, par-boiled and diced


Directions:

Heat oven to 425'F. 

Combine flour and salt in large bowl; cut in shortening with pastry blender or fork until mixture resembles coarse crumbs.  Mix in enough cold water with fork until flour is moistened.  Divide dough in half.  Shape each half into a ball;  flatten slightly.  Wrap 1 ball in plastic food wrap; refrigerate.

Roll out remaining ball of dough onto lightly floured surface into 11" circle.  Fold into quarters.  Place dough into ungreased 9" pie plate; unfold dough, pressing firmly against bottom and sides.  Trim crust to 1/2" from edge of pan; set aside.

In 2-quart saucepan, melt butter over medium heat.  Add onion; cook 2 minutes, stirring frequently, until tender.  Stir in flour, salt and pepper until well blended.  Gradually stir in broth and milk, cooking and stirring until bubbly and thickened.  Stir in chicken and mixed vegetables.  Remove from heat.  Spoon into crust-lined pie plate.

Roll out refrigerated ball of dough onto lightly floured surface into 11" circle.  Gently fold dough into quarters.  Place dough over filling; unfold to cover top.  Trim, seal and crimp edges.

Bake 30-40 minutes or until crust is golden brown.  During the last 15-20 minutes of baking, cover edge of crust with strips of aluminum foil to prevent excessive browning.

Let stand 5 minutes before serving.

Yields: 6


"You have made known to me the paths of life; you will fill me with joy in your presence."   -Acts 2:28


Sunday, November 23, 2014

Old-Fashioned Applesauce

A Thanksgiving "Must-have"


I know!  Applesauce is just something you buy from the grocery store and spoon out of the jar.  But, once you try this, you'll never want store-bought again.  And, it's so incredibly easy!

You'll notice that the recipes I like to post are those that are easy, tasty and filling.  I always figure that if my family likes them, that's the "okay" I need to share them with everyone!  This is definitely one that my family "must have" on the Thanksgiving table!

Just to give you a little hint at how good it is...I usually have to double or make 1 1/2 times the amount used in the original recipe.  Also, we like it chunky, so I take it off the stove before it all gets really smooth. 


Directions:

4 medium cooking apples (pared, quartered and cored)
1 cup water
1/2 cup brown sugar, packed
1/4 tsp. cinnamon
1/8 tsp. nutmeg

Heat apples and water over medium heat to boiling. 

Reduce heat:  simmer, stirring occasionally for 5 to 10 minutes or until tender.  (This is where you decide if you want it chunky or smooth.)

Stir in brown sugar, cinnamon and nutmeg; heat to boiling.  

Makes about 4 cups.

Be encouraged!
"Give thanks to the LORD, for he is good; his love endures forever."   -Psalm 107:1

Thursday, November 20, 2014

Cheesy Pull-apart Bread


Also known as "Crack Bread"


There are about a million recipes for Pull Apart Bread all over the web, Pinterest and food blogs.  The variations are endless, and depending on your taste, you can really make it fit to your family's preferences.  I found this one on Taste of Home, and made a few adjustments.   I hope you'll make this for your holiday dinner or gathering.  It's a winner!

I tried it for our Italian Christmas dinner a couple of years ago, it couldn't have been better!  My family loves garlic bread, pizza, cheese... all the good stuff.  Hehe! 
 

But, it almost didn't make it to the table!   My kids were helping me put out all the food, and we didn't realize how slippery the bread was on the plate.  Good thing my son-in-law has fast reflexes.  Here's the picture of how Mike saved the bread.  It was pretty funny!   Notice the look of terror on Matt's face...he thought it was a goner.  Ha!

Mike and Matt saving the bread.


Directions:

1 (1 lb) round loaf sourdough bread
6 oz provolone cheese, shredded
6 oz sharp cheddar cheese, shredded
1/2 cup (1 stick) unsalted butter, melted
1 clove garlic, minced

1/2 tsp. granulated garlic or garlic powder
1/8 tsp. onion powder
1/2 tsp. dried Italian seasoning
Chopped fresh parsley, garnish (if desired)


Preheat oven to 375 degrees. Rip off a large enough piece of foil to wrap around the loaf; coat with nonstick spray and place on a baking sheet.

Cut the loaf of bread into 1-inch slices with a serrated knife, leaving about 1/4-inch of the base of the bread intact. Repeat cuts in the opposite direction to create a crosshatch/cubed pattern. Place bread on the foil.

Press the shredded cheese between all the slices of bread.

In a small bowl, whisk together the butter, minced garlic, garlic powder, onion powder, and Italian seasoning. Gently pry apart the bread pieces and drizzle the mixture over the loaf evenly, making sure to get in all the seams and cover all the pieces.

Wrap the bread up in the foil. Bake for 15 minutes.

Open up the foil, increase oven temperature to 425 degrees, and bake another 10 minutes until the cheese is melted and the bread is golden brown.

Let stand 5 minutes before serving, sprinkle with parsley and enjoy!


"Walk with the wise and become wise, for a companion of fools suffers harm."  - Proverbs 13:20


Tuesday, November 11, 2014

Get Ready for the Holidays

Hey Everyone!


Thanksgiving is the perfect time for entertaining friends and family, getting together in your home is the perfect way to give thanks and show appreciation to those we love. 

But, let's face it, we can get really stressed about making sure everyone, including ourselves enjoy the big day.  So, I  put together a list of Helpful Holiday Hints that I hope will allow you to diminish your stress level this season.

Just click on the "Good to Know" icon on the right side of my homepage, and there you'll find 10 ideas that I use every year to help make it a great holiday for all!

God bless you, this season, as you take time to give thanks and cherish the loved ones that surround your Thanksgiving table!

Saturday, November 8, 2014

Sweet Potato Casserole

One word describes this dish...yummy!


Thanksgiving is probably my favorite holiday because it's a time to reflect on all the blessings God has given us.  It's pure family and friends time with the special people He's placed in our lives, many who have been by our side through good times and hard times.  The Lord never leaves us, no matter what we endure, and is always there to lead the way through any storm that life may throw at us.


It's also a special day for us, food-wise!  And I like to make my family's favorite holiday dishes.  The turkey, in our home, is not the star...it's all the side dishes.  This sweet potato casserole took center stage at our table quite a few years ago when I discovered a recipe that looked simply delicious!

Over time, I've made some changes that the family really loved best of all!  I roasted the sweet potatoes, instead of boiled them and divided the milk into half milk and half Southern Butter Pecan Coffee Creamer (I think that's what took it to a new level.) 

I've had to eliminate the chopped pecans due to family members with allergies, but it didn't change the great taste of the casserole at all.

Roasting the potatoes in the oven tastes totally different than boiling them. So, I've made some changes to the original recipe and ended up with a casserole that everyone raves about.   Hope you'll try it and get "rave reviews" from the loved ones around your Thanksgiving table!    

Ingredients:

4 cups sweet potatoes, roasted or microwaved, then cubed
1/4 cup white sugar
2 eggs, beaten
1/2 tsp. salt
4 Tbsp. butter, softened
1/4 cup milk
1/4 cup Southern Butter Pecan Coffee Creamer (secret ingredient)
1/2 tsp. vanilla
1 tsp. cinnamon
Dash of ground nutmeg and cloves

Topping: (I've been known to double this; make it ahead of time and store in a plastic bag until it's time to top the casserole)

1/2 cup brown sugar, packed
1/3 cup all-purpose flour
3 Tbsp. butter, softened
1/2 cup chopped pecans (optional)
Mini marshmallows (optional)

Preheat oven to 325'F.   Grease or spray a 9x13" baking dish.

*Roast sweet potatoes in oven or microwave until soft and ready to peel and mash.  Do not boil, this is so much easier!

In a large bowl, mix together the mashed sweet potatoes, white sugar, eggs, salt, butter, milk, creamer and vanilla extract.  Mix until smooth.  Transfer to a greased 9x13" baking dish.

In medium bowl, mix the brown sugar and flour.  Cut in the butter with a fork, until the mixture is coarse.  Stir in the pecans. (opt.)  Sprinkle this mixture over the sweet potato mixture.

Bake in the preheated oven for 30 minutes or until the topping is lightly brown.

If you're adding the marshmallows, just spread them over the top and return to the oven for about 5 minutes or until they start to brown.

*Wash the sweet potatoes, wrap each in aluminum foil and bake in a 425'F. oven.  Bake for 45 minutes or until a fork can easily pierce through to the middle.

Yields: 10-12 servings

Hint:  When making food for a holiday, do all your prep work a 2-3 days in advance.  For all my casseroles I mix them, pour into their baking dish and place an aluminum foil cover over it, where I've written the oven temperature and baking time for that dish.  Into the fridge they go until it's time to bake them.


Be encouraged!
"Give thanks to the Lord, for He is good; His love endures forever."   -1 Chronicles 16:34


Wednesday, November 5, 2014

Chocolate Pumpkin Muffins

Only two ingredients & 90 calories each!

Once in a while, a recipe comes along that's so easy you just think it's "too good to be true."   This is one of those recipes!

My granddaughter is always looking for good recipes with great flavor and lower calories.  In case I didn't mention it, she's lost over 120 lbs.   Yes, I am so very proud of her!  She's been working hard for over a year and is dedicated to better health for herself and her hubby. 

Andrea found this on the WW page and it's our new favorite muffin.   Not only are these muffins easy to make, they are so delicious, rich and super moist! 

I gave one to my neighbor, who doesn't like pumpkin and he loved them.  I almost felt guilty that I didn't tell him what was in it until after he ate it.  He was shocked!


You may be tempted to add the eggs, oil, water according to the cake mix directions, but DON'T DO IT!   I promise, you don't need any of it!   Just look at that gorgeous muffin Andrea made...yours will be beautiful and delicious too!

If you're not a big chocolate fan, then try this with Duncan Hines Spice Cake Mix...delicious!


Ingredients:

1 box of Duncan Hines chocolate cake mix
1 (15 oz.) can of pumpkin puree (not pumpkin pie filling)
1 cup chocolate chips, regular or mini (if desired)

Preheat your oven to 350 degrees.

Dump ingredients into a large mixing bowl. Blend with a mixer for two minutes on medium speed or until well mixed. The batter will be thick. If desired, use a spatula to fold in chocolate chips.  Use an ice cream scoop to spoon batter into lined or greased muffin tins. (Spray liners with Pam or the muffins will stick to the paper.)

Bake at 350 degrees for 18-22 minutes or until a toothpick comes out clean. Let muffins cool before removing from the muffin tins.

You may choose to top them with powdered sugar or frosting, but they really don't need anything.

"Christ honors our submission even when our only motivation is obedience." - Beth Moore


Saturday, November 1, 2014

Better Than Anything Cake

The perfect gooey dessert!


This cake has been around since the early 2000's, but I have to confess, I found out about it just a few years ago.

I've made it three times already!   Once for my family and twice for others who needed  a scrumptious dessert for a special occasion.   People just love this dessert, and it couldn't be easier to make!

I just finished making it for my son-in-law's birthday dessert.  Mike loves chocolate and I love to surprise him with different desserts featuring some kind of chocolate, ooey-gooey deliciousness.  I'm pretty positive this one will not disappoint!

Try it, you will definitely make an impression on your family and friends!

*Okay everyone, I'm adding a little "tag" to this post.  I decided to make a frosting, instead of using just the Cool Whip...and it added a richness that was lost with frozen topping alone.  It made a world of difference!

Ingredients:
1 box German chocolate, devil's food or yellow cake mix (baked according to box directions)
1 (14 oz.) can sweetened condensed milk
1 (8 oz.) jar caramel topping, room temperature
1 (8 oz.) container Cool Whip (thawed) *see tag below 
1 (8 oz.) bag of chocolate covered toffee chips (or chopped up Skors bars)

Heat oven to 350°F (325°F for dark or nonstick pan).  Make and bake cake as directed on box for 13x9-inch pan. Cool 15 minutes. 

Poke top of warm cake every 1/2 inch with handle end of wooden spoon. (If cake sticks a bit, just clean off the handle and continue.)

Drizzle condensed milk evenly over top of cake; let stand until milk has been absorbed into cake.

Drizzle with 3/4 of the caramel topping.  Run knife around sides of pan to loosen cake.

Cover and refrigerate overnight for best results.

Spread whipped topping over top of cake. Sprinkle with toffee bits, and drizzle with the rest of the caramel topping. Store covered in refrigerator.

*(Whip together 1 small pkg. of instant vanilla pudding, 1/4 cup confectioner's sugar, 1/2 tsp. vanilla and 1 cup milk.  Then stir in the 8oz. container of Cool Whip.)   


Be encouraged!
"And we know that all things work together for good to them that love God, to them who are the called according to his purpose."   -Romans 8:28