Thursday, July 30, 2015

Nutella Brownies

Just 4 ingredients!


This takes just about 5 minutes to prepare and will give you 16 of the most yummy, chewy, chocolaty, fudgy brownies ever.  

We love Nutella, so that's what I used in these gorgeous brownies.  I'm sure you can use any flavor chocolate spread that your family enjoys. 

Ingredients:
1 1/4 cup (13 ounce container) Nutella Chocolate Hazelnut Spread
2 large eggs
1/2 cup all-purpose flour (heaping) 
1/2 tsp. salt

Preheat oven to 350'F.   Prepare 8"x8" baking pan with cooking spray.  Set aside.

Mix chocolate spread and eggs in a medium bowl until combined.  Add flour and salt; mix until all is combined.
Pour batter into prepared pan and spread evenly.

Bake 20 minutes or until a toothpick inserted comes out clean.

Enjoy!

A Tip from Grammy:
-Use a disposable plastic knife!  It will cut through the brownies like butter and will not tear up the edges, even when they're hot!


Be encouraged!
For in the gospel the righteousness of God is revealed—a righteousness that is by faith from first to last, just as it is written:  "The righteous will live by faith."   - Romans 1:17
  

Wednesday, July 29, 2015

Fresh Peach Pie

This pie is a "peach!"


 Nothing says "summer" like a home-made peach pie!   And one of our favorite summer things to do is to visit the peach farm in South Carolina.  It's a great place to go, with a restaurant, antique barn filled with beautifully refurbished cars and hundreds of antiques, homemade cobblers and ice cream, festivals and many activities throughout the year.  If you haven't been to McLeod Farms in McBee, SC, and you live in the area, give it a try.   Be sure to eat at Big's while your there, best burgers ever!  Uh, no, I don't work for them, honest.  Haha!

 
Okay, back to this pie!  I believe it's the most delicious recipe I found, and of course, it's from my old Betty Crocker Cookbook.  I did add a little nutmeg to it because we love the taste of cinnamon and nutmeg together. 

Make sure you cool it for at least 2 hours before serving to prevent it from breaking up.  It's an easy recipe to follow and only takes about 30 minutes actual prep time.  The hard part is waiting for it to cool!  But, remember, patience is a virtue. 

Ingredients:                                      
Pastry for a 9", two-crust pie        
6 cups sliced fresh peaches, sliced (about 8 peaches)
(instructions on the easiest way to peel below)
1 tsp. lemon juice
1 1/4 cups sugar
1/3 cup flour
1/2 tsp. cinnamon
1/4 tsp. nutmeg
3 Tbsp. butter


How to peel peaches: Make sure they are fresh and ripe!

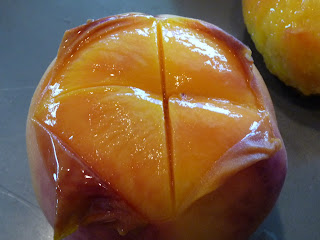
1.  Cut an X on the bottom of each peach.  Immerse in a large pot of boiling water for 30-40 seconds.  

2. Remove with a slotted spoon. Immediately place in bowl of ice water to cool the peaches and stop the cooking process.

3. Use a paring knife to peel the skin, which should easily peel off by just pulling on it. If stubborn areas of skin won't peel off, just return fruit to the boiling water for a few more seconds and repeat the process. (I had one stubborn one, who went back in.)

4. Cut peaches in half by cutting around the pit, and twisting the halves in opposite directions.  Use a sharp paring knife to remove pit.  Now, slice fairly thin.


Preheat the oven to 450'F.

Line the bottom and sides of a 9 inch pie plate with one of the pie crusts.

Place the sliced peaches in a large bowl, and sprinkle with lemon juice; mix gently.

In a separate bowl, mix together the flour, sugar, cinnamon, and nutmeg. Pour over the peaches, and mix gently. Pour into the pie crust, and dot with butter. Cover with the other pie crust, and fold the edges under. Flute the edges to seal.  Lightly brush the top with a little heavy cream and sprinkle with sugar.  Cut slits to allow steam to escape.

Bake for 10 minutes in the preheated oven, then reduce the heat to 350'F. and bake for an additional 40 to 45 minutes, until the crust is brown and the juice begins to bubble through the vents. (I always place my fruit pies on a sheet pan to catch any drips and save a big mess in my oven.) 

If the edges brown to fast, cover them with strips of aluminum foil about halfway through baking.  Cool before serving.

A Tip from Grammy:
-Serve warm with a scoop of vanilla or peach ice cream. It's the best!


Be encouraged!
"Get rid of all moral filth and the evil that is so prevalent and humbly accept the word planted in you, which can save you."    - James 1:21 

Monday, July 20, 2015

Amish Cinnamon Bread Alternative

No "Starter" Necessary!


A number of years ago, I was given a plastic bag with instructions on how to "care and feed" the "starter" mixture inside.  I can recall adding flour and sugar on certain days or just kneading it on others.   Believe me, it was worth the effort because it produced the best cinnamon bread ever.  At the end you would  make two loaves and still have enough of this starter mixture left to put into other plastic bags and give away to friends and neighbors.  We always called it Friendship Bread, and we all loved it.

Well, that was great while it lasted, but there was only one problem with that method.  You always ended up with more to give away than anyone possibly wanted.  I seem to remember neighbors locking their front doors and pulling the shades down when they saw me coming, and friends conveniently "forgetting" who I was...ha, you get the picture. 

Yesterday, on my Facebook page, someone posted this recipe for Amish Cinnamon Bread ALTERNATIVE  from  Redfly Creations!   This caught my eye, big time!  I'm thinking, this can't be as good as the original, but I knew I had to try it. 

Mmmm...glad I did! 

Batter:
1 cup butter, softened
2 cups sugar
2 eggs
2 tsp. vanilla (optional)
2 cups buttermilk or 2 cups milk plus 2 tablespoons vinegar or lemon juice
4 cups flour
2 teaspoons baking soda

Cinnamon/Sugar Mixture: Mix in separate bowl.
2/3 cups sugar
2 teaspoons cinnamon 

Instructions:
Preheat oven to 350'F.   Grease and flour 2 (9X5") loaf pans. 

Cream together butter, 2 cups of sugar, and eggs.  Add milk, flour, and baking soda.  

Put 1/2 of batter (or a little less) into greased loaf pans (1/4 in each pan).  

In separate bowl, mix the 2/3 c sugar and cinnamon.  

Divide 3/4 of cinnamon mixture, and sprinkle onto the top of the batter in each pan.  

Add remaining batter to pans; sprinkle with last of cinnamon topping.  Swirl with a knife to create a marble effect.  If you like and save some cinnamon/sugar mix to sprinkle on the top.

Bake at 350 degrees for 45-50 minutes or until toothpick tester come clean.  
Cool in pan for 15-20 minutes before removing from pan.

Yields: 2 loaves

Be encouraged!
"Search me, God, and know my heart; test me and know my concerns."  -Psalm 139:23

Sunday, July 19, 2015

Pork Loin with Wine and Herb Gravy

 Seriously, the best pork roast I've ever eaten!


I don't know where to begin to describe this amazing pork loin roast! What a fabulous dish...like eating in a fancy restaurant!  Really, that's how good it was and it's all cooked on top of the stove, in one pan! 

When I lived in Michigan, one of my closest friends was my neighbor who lived right across the street. She had three beautiful kids, a handsome son and twin girls. We would do so much together, even go over to each other's homes just to play piano together and she encouraged me in my faith! 

It was her daughter that found it on Pinterest and posted it on her Facebook page.  She raved about it, so, you know I had to try it out. Thanks, Shelly, you can share your recipes with me anytime, sweetie!
 
Ingredients:
1/4 cup olive or vegetable oil
5 cloves garlic, peeled and slice in half lengthwise
2-3 Tbsp. fresh rosemary leaves, chopped
1/4 cup fresh sage leaves, roughly chopped
2 lb. center pork loin (or two 1 lb. pork tenderloins)
1 1/4 cups dry white wine (plus a bit more to deglaze pan)
Kosher salt and freshly ground black pepper
1/2 cup chicken broth or stock
1/2 cup heavy cream (or a lighter cream, mixed with 2 tsp. cornstarch)
1 Tbsp. butter

Heat the oil in a large Dutch oven over medium-high heat. Sauté the garlic, rosemary and sage, stirring, for about one minute.  Add the pork loin to the pan, carefully placing it on top of the herbs.  Sauté the pork for about 5 minutes on each side, then remove it to a plate.  Add the wine to the pan and use a wooden spoon to scrape the bottom of the pan.  Cook until the smell of the alcohol has disappeared, about 1 to 2 minutes.
 
Lower the heat under the pan to low-medium heat. Return the pork to the pan and season with salt and pepper. Partially cover with a lid and cook for about 1 1/2 hours (probably less if you're using a pork tenderloin), flipping the pork and scraping the bottom of the pan every 20 minutes or so. Keep an eye on it, making sure there continues to be some liquid in the pan. Add 1/4 cup of warm water if necessary.
 
When the pork is cooked through (if you want to test with a thermometer, it should be about 150° internal temperature) remove pork to a plate to rest.  Meanwhile, increase the heat under the liquid in the pan to medium.  If your pan has very little liquid, deglaze with a splash of white wine.  Stir well to loosen the browned bits on the bottom of the pan.  Allow to cook until the alcohol smell disappears (about 1-2 minutes).  Add the chicken stock.  Remove pot from heat and allow to cool in the pot for 20 minutes.
 
When the sauce has cooled, add the cream and put the pan back on the stove.  Heat gently over medium-low heat, stirring the sauce constantly until it thickens a bit and warms.  Avoid boiling. (*If your sauce doesn't thicken up, mix 2 Tbsp. cornstarch with 2 Tbsp. water and add a bit at a time to your sauce until it thickens to your liking.) 

Taste sauce and add salt and freshly ground pepper, to taste.
 
Place the resting pork on a cutting board (you can add any accumulated meat juices back to the sauce if you like!). Slice the pork thinly and place onto a serving platter.  Pour the warm gravy over top.


Be encouraged!
Let us run with endurance, the race that is set before us, fixing our eyes on Jesus, the author and finisher of our faith.   -Hebrews 12:1,2

Sunday, July 12, 2015

Banana Cupcakes with Cream Cheese Frosting

So easy and sooo good!


I already had the day set to make my hubby his Fresh Cherry Pie, and make my girls cinnamon cookies with the leftover crust, when I noticed...brown bananas in the fruit bowl again, really brown bananas!   Oh no, this isn't good, they won't last another day and I've run out of baking powder and flour.  Not to worry, I found a cake mix (love them doctored up) and searched for a recipe online.

Voila!  Banana Cupcakes with Cream Cheese Frosting!  I feel like a mad baker lady today!


Ingredients:

Cupcake:
1 box of yellow cake mix       
3-4 large, ripe bananas
1 cup milk
1 tsp. baking soda
3 eggs
1/2 cup (1 stick) butter

Preheat oven to 350'F.

Mash bananas, in a large bowl, until they turn to liquid form. 

Add cake mix, milk, baking soda, eggs and butter: mix until thoroughly blended, about 2-3 minutes with a mixer.

Place liners into the cupcake tin and fill, leaving 1/2" at the top.

Bake for 18-20 minutes or until toothpick, inserted, comes out clean. 

Cool completely before frosting.


Frosting: (The best cream cheese frosting...EVER!)
1 (8oz.) pkg. cream cheese, room temperature
1/2 cup (1 stick) butter, room temperature
2 tsp. vanilla extract
1/4 tsp. salt
3-4 cups confectioners' sugar

Cream butter and cream cheese with vanilla and salt.  Add confectioners' sugar 1 cup at a time until you reach a creamy consistency that will hold a peak. (I stopped at 3 cups)


Be encouraged!
"Let your gentleness be known to all.  The Lord is near."  -Philippians 4:5


Saturday, July 11, 2015

Fresh Cherry Pie

Perfect with whipped cream or ice cream!


While grocery shopping the other day, I saw that cherries were relatively cheap right now and it reminded me of this recipe from a few years ago.

This was my first cherry pie and I thought it would be much harder to make. Surprise! It was simple and made great use of my newly bought cherry-pitter...what a great little tool!
Oh my goodness, I had no idea this could be so easy to do, and is worth the extra effort of using fresh cherries.

Since I never made a pie with cherries,  I went straight to my trusty old Betty Crocker cookbook and, of course there it was, the recipe for Fresh Cherry Pie.  Now, I love Betty, but her pie looked a pit plain.  There were no signs of the spices I like to add to my fruit pies, so I've changed up her recipe and made it my own with flavors my family enjoys.  
Yes, I play with my food, and I encourage you to do the same! LOL!

Ingredients:

9" pie crust (enough for a top and bottom) homemade or store bought
   *Try my Mom's Flaky Pasty below, so tender and good! 
4 cups fresh, pitted cherries
1/4- 1/2 cup water (or cherry juice) I didn't have cherry juice, so the water worked fine
1 1/3 cups sugar
1/2 flour
1/2 tsp. vanilla extract
1/4 tsp. almond extract
1 tsp. ground cinnamon
1/4 tsp. ground nutmeg
1 1/2 Tbsp. butter

Heat oven to 425'F.

Place cherries in large saucepan and place over heat. Cover. After the cherries lose considerable juice, which may take a few minutes, remove from heat.

In a small bowl, mix the sugar and cornstarch together. Pour this mixture into the hot cherries and mix well. Add the extracts and spices, if desired, and mix.  

Return the mixture to the stove and cook over low heat until thickened, stirring frequently.  Remove from the heat and let cool. If the filling is too thick, add a little water, too thin, add a little more flour. Let cool while you prepare the crust.

Line a 9" pie plate with crust.  Turn cooled cherry mixture evenly onto the bottom crust, and dot with butter.  Cover with top crust and make slits for the steam to escape (or make a lattice top); seal the edges and flute. 

Optional for topping:  Brush top with milk, half and half or cream and sprinkle sugar for a pretty, glistening top.

Bake for 12-14 minutes until top starts to brown.  If the top and edges are getting too brown, cover loosely with aluminum foil to prevent burning.  Lower oven to 375' F. and bake another 45-60 minutes until top is golden brown and juices start to flow through the slits.  

Remove from oven and let cool completely.  In fact, it's best to wait at least 6 hours before cutting into it, so the juices will thicken more.

Mom's Flaky Pastry:
2 c. flour
1 c. shortening
1 tsp. salt
3-4 Tbsp. cold water

Combine flour, shortening and salt; cut with a pastry cutter or fork until it looks like coarse meal.  Then add water (start with 3 Tbsp.) then if it's still dry add more, 1 Tbsp. at a time.  Divide in half, this makes 2, 9" bottom crusts, or a top & bottom.  Roll out on floured surface, using enough flour so the dough won't stick.

Be encouraged!
God blesses those who mourn, for they will be comforted.  -Matthew 5:4

Wednesday, July 8, 2015

Grammy's Chicken Cacciatore

Pollo alla Cacciatora

 
Cacciatore literally means "hunter" in Italian.  In cuisine, "alla cacciatora" refers to a meal prepared "hunter-style" with tomatoes, onions, herbs, often bell pepper and sometimes wine.  Cacciatore is popularly made with braised chicken or veal.   In the United States, cacciatore dishes may be prepared with marinara sauce, though in Italy the dish does not always include tomatoes.
 
My mom always made it with sauce, and my husband loves it with the heat of crushed red pepper.  It's really an easy meal and can be served plain or over pasta, rice or polenta.   You can also braise the chicken and then put everything into the crockpot and cook for a few hours.  It's all good!
 

Ingredients:

2-3 Tbsp. extra virgin olive oil
2-3 boneless chicken breasts, cut into chunks
3 cloves garlic, minced
1 green bell pepper, sliced
1 red bell pepper, sliced
1 yellow bell pepper, sliced
1 large onion, sliced
1 (28oz.) can crushed tomatoes
1/2 cup white whine
1/2 tsp. oregano
1/2 tsp. parsley
2 leaves fresh basil or 1 tsp. dried
1 tsp. salt
1/4 tsp. black pepper
1 small can sliced mushrooms
crushed red pepper to taste (optional)
 
Sauté chicken pieces in olive oil in a large, covered skillet until chicken is lightly browned on each side.  Add garlic and crushed pepper (if desired).  Cook on low for a few minutes, stirring occasionally.
 
Add peppers and onion, cook until slightly tender. 
 
Add crushed tomatoes, white wine, seasonings and cook over medium heat until sauce begins to boil.  Reduce heat to low and simmer, covered, for 30-45 minutes, or until chicken is tender and cooked through.
 
When sauce and chicken are done, add mushrooms and let them heat through...a matter of a couple minutes.
 
Serve with grated parmesan, over pasta, spaghetti or rice. 
 
 
"In him [Jesus our Lord] and through faith in him we may approach God with freedom and confidence." - Ephesians 3:12


Thursday, July 2, 2015

Stuffed Artichokes


Italian Stuffed Artichokes!
 
We like ours with marinara sauce, but plain ones are just as good!
My favorite way to eat vegetables...stuffed with yummy goodness!   This dish, alone, could convince me to become a vegetarian! 

You can make this a main dish by adding cooked, loose sausage or seasoned, cooked ground beef.  Mint, anchovies, toasted pine nuts and crushed red pepper are just a few other seasonings that have also been used in this filling.   Another recipe you can make your own, by adding your favorites!

I would eat these every day, if it weren't for the price of artichokes.  But, if you're like me, look for them on sale...get them right away.  Don't want to make these yet?  No problem!   Just freeze them after boiling, they'll keep for a few months and will save you some steps when you do make them! 

Ingredients:

4-6 medium sized artichokes
1 lb. plain bread crumbs
1/2 cup grated Romano or Parmesan cheese (or more, if you like cheese)
2 cloves garlic, finely chopped
Fresh parsley
Salt and pepper
Extra virgin olive oil (about 1/4 cup...this is an approximate)


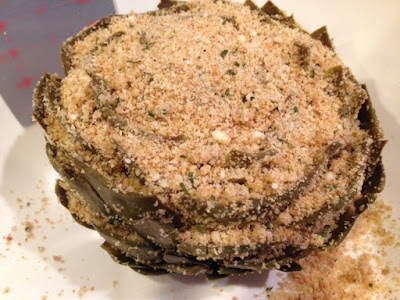
Pretty, isn't it?

Cut artichoke stem so that it stands flat. Trim the pointy tips off of all the leaves. (If you like, peel the stem and add it to the pan, it's edible and very good.)

Place in large saucepan, cover with water and bring to a boil. Cover, reduce heat to low, and simmer for 15-20 minutes, until artichoke is tender.  To test the tenderness, stick a butter knife or the tines of fork into the stem.  If it slides in easily, the artichoke is done.  Reserve some of the water to add to sauce.

In a large bowl combine bread crumbs, cheese, parsley, garlic, and pepper.
Mix well; slowly add the oil till the crumb mixture is moistened enough to stick together.  You may need to adjust the amount of oil depending on the type and amount of bread crumbs used.  (You want the mixture to stick together or it will be too dry.  Sometimes I'll add a little of the artichoke water.)

Using a teaspoon or your fingers, tug each leaf outward a little to make room for the stuffing.   Generously stuff some filling in between all of the leaves, starting at the bottom and working around to the top, including the center.  (I do this in a bowl to catch any filling that might fall as you stuff them.)


Now you can add sauce or a little olive oil over the top, sprinkle with Parmesan and bake.

Cover bottom of baking pan with sauce mixed with a little reserved artichoke water to about 1/2 inch.  Place stuffed artichokes into a large baking pan.  Bake at 375 degrees for 15-20 minutes, until the filling is golden brown.
Drizzle tops with olive oil and/or tomato sauce.  Sprinkle with grated cheese.  Cover with aluminum foil.
Bake at 375'F. for approximately 1 hour (depending on the size of your artichokes) or until leaves pull out easily. 
Cool for about 10 minutes before serving.


Now, how do you eat this thing?
Pull out a leaf, and with your bottom teeth scrape the filling and meat of the leaf into your mouth.
Once you've eaten all the outer leaves...pull out the middle section from the bottom.  Now spoon out fuzzy center at base; discard.   The bottom or "heart" of the artichoke is both edible and delicious!
We've never used utensils...just fingers (best tools of the kitchen)!   Yes, it's messy, but so worth it...just have lots of napkins on hand! 
Here's a visual I found on the Food Network website!


Be encouraged!
"You are the light of the world; A city that is set on a hill cannot be hidden. Let your light so shine before men, that they may see your good works, and glorify your Father in heaven." ~Matthew 5:14,16

Wednesday, July 1, 2015

Cannoli Dip

An easy way to get your Cannoli fix! 

Photo from Pinterest

Here's a little history on this popular Italian pastry.  Cannoli is a Sicilian pastry dessert that originated in the Palermo region where cannoli were prepared during Carnevale season as a symbol of fertility.  The pastry eventually became a year round dessert throughout Italy, although in Italy they are commonly known as cannoli siciliani. 
A traditional cannolo - photo from Wikipedia

Cannoli are sometimes called cannolis which is not the correct term.  Cannoli is the proper plural and cannolo is the singular (cannolo in Sicilian means little tube).

Thought you'd might enjoy the history of cannoli and a little Italian "grammar" lesson!  But, let's face it, whatever you call them...cannoli or cannolo...they are one of the most delicious pastries in the world and my personal favorite!

That's why I love to make anything that has the cannoli filling in it...so here's my latest find!   I'll be making this for my granddaughter's baby shower, I know she'll love it! 

Ingredients:
2 cups ricotta cheese (drain in a colander a few hours or overnight)
8 ounces Mascarpone (cream cheese can be substituted for this)

1 1/2 cups confectioners' sugar
1 teaspoon vanilla
1 cup mini chocolate chips


Photo from Pinterest

Beat ricotta cheese and mascarpone together in a bowl until smooth; add sugar and vanilla. Continue to stir mixture until sugar is completely incorporated. 

Fold in chocolate chips throughout the cheese mixture; save a few to sprinkle on top.

Cover bowl with plastic wrap and refrigerate until chilled, at least 10 minutes.

Serve with broken pizzelles, sugar cones, vanilla wafers, graham crackers.  Some stores sell Cannoli Chips, but I haven't seen them in my grocery store.   I'm going to have to ask around!

That's it!  The taste of cannoli in an easy-to-make dip...I love this!


Be encouraged!
"And when the Chief Shepherd appears, you will receive the crown of glory that will never fade away."   - 1 Peter 5:4