Who doesn't love Chicken Pot Pie?
Let's face it, this is just about everyone's idea of "comfort food". I know it's one of my favorites!
This is an excellent recipe and one that's easy to make. You can even make it more simple by buying a prepared pie crust from your local grocery store. It's a great way to use leftover chicken or turkey. I also love using Rotisserie chicken because it adds extra flavor and is always to tender.
My granddaughter's husband said he wasn't a fan of pot pie, but he would taste it anyway. Yay, a convert! He loved it, and is looking forward to it again. Guess I'm going to have to make this soon!
Since I'm posting on the day after Thanksgiving, this is a great way to use up some of that leftover Turkey. Just substitute it for the chicken and "Viola!" Turkey Pot Pie.
Hmmm...I just might do that myself tonight! Hehe!
Crust:
2 cups all-purpose
1 tsp. salt
2/3 cup plus 2 Tbsp. shortening
4-6 Tbsp. cold water
Filling:
1/3 cup butter
1/3 cup chopped onion
1/3 cup all-purpose flour
1/2 tsp. salt
1/4 tsp. pepper
1 3/4 cups chicken broth (from 32 oz. carton)
1/2 cup milk
2 1/2 cups shredded cooked chicken or turkey
2 cups frozen mixed vegetables, thawed
3 med. potatoes, par-boiled and diced
Directions:
Heat oven to 425'F.
Combine flour and salt in large bowl; cut in shortening with pastry blender or fork until mixture resembles coarse crumbs. Mix in enough cold water with fork until flour is moistened. Divide dough in half. Shape each half into a ball; flatten slightly. Wrap 1 ball in plastic food wrap; refrigerate.
Roll out remaining ball of dough onto lightly floured surface into 11" circle. Fold into quarters. Place dough into ungreased 9" pie plate; unfold dough, pressing firmly against bottom and sides. Trim crust to 1/2" from edge of pan; set aside.
In 2-quart saucepan, melt butter over medium heat. Add onion; cook 2 minutes, stirring frequently, until tender. Stir in flour, salt and pepper until well blended. Gradually stir in broth and milk, cooking and stirring until bubbly and thickened. Stir in chicken and mixed vegetables. Remove from heat. Spoon into crust-lined pie plate.
Roll out refrigerated ball of dough onto lightly floured surface into 11" circle. Gently fold dough into quarters. Place dough over filling; unfold to cover top. Trim, seal and crimp edges.
Bake 30-40 minutes or until crust is golden brown. During the last 15-20 minutes of baking, cover edge of crust with strips of aluminum foil to prevent excessive browning.
Let stand 5 minutes before serving.
Yields: 6
"You have made known to me the paths of life; you will fill me with joy in your presence." -Acts 2:28
Friday, November 28, 2014
Sunday, November 23, 2014
Old-Fashioned Applesauce
A Thanksgiving "Must-have"
I know! Applesauce is just something you buy from the grocery store and spoon out of the jar. But, once you try this, you'll never want store-bought again. And, it's so incredibly easy!
You'll notice that the recipes I like to post are those that are easy, tasty and filling. I always figure that if my family likes them, that's the "okay" I need to share them with everyone! This is definitely one that my family "must have" on the Thanksgiving table!
Just to give you a little hint at how good it is...I usually have to double or make 1 1/2 times the amount used in the original recipe. Also, we like it chunky, so I take it off the stove before it all gets really smooth.
Directions:
4 medium cooking apples (pared, quartered and cored)
1 cup water
1/2 cup brown sugar, packed
1/4 tsp. cinnamon
1/8 tsp. nutmeg
Heat apples and water over medium heat to boiling.
Reduce heat: simmer, stirring occasionally for 5 to 10 minutes or until tender. (This is where you decide if you want it chunky or smooth.)
Stir in brown sugar, cinnamon and nutmeg; heat to boiling.
Makes about 4 cups.
Be encouraged!
"Give thanks to the LORD, for he is good; his love endures forever." -Psalm 107:1
Thursday, November 20, 2014
Cheesy Pull-apart Bread
Also known as "Crack Bread"
I tried it for our Italian Christmas dinner a couple of years ago, it couldn't have been better! My family loves garlic bread, pizza, cheese... all the good stuff. Hehe!
But, it almost didn't make it to the table! My kids were helping me put out all the food, and we didn't realize how slippery the bread was on the plate. Good thing my son-in-law has fast reflexes. Here's the picture of how Mike saved the bread. It was pretty funny! Notice the look of terror on Matt's face...he thought it was a goner. Ha!
Mike and Matt saving the bread. |
Directions:
1 (1 lb) round loaf sourdough bread
6 oz provolone cheese, shredded
6 oz sharp cheddar cheese, shredded
1/2 cup (1 stick) unsalted butter, melted
1 clove garlic, minced
1/2 tsp. granulated garlic or garlic powder
1/8 tsp. onion powder
1/2 tsp. dried Italian seasoning
Chopped fresh parsley, garnish (if desired)
Preheat oven to 375 degrees. Rip off a large enough piece of foil to wrap around the loaf; coat with nonstick spray and place on a baking sheet.
Cut the loaf of bread into 1-inch slices with a serrated knife, leaving about 1/4-inch of the base of the bread intact. Repeat cuts in the opposite direction to create a crosshatch/cubed pattern. Place bread on the foil.
Press the shredded cheese between all the slices of bread.
In a small bowl, whisk together the butter, minced garlic, garlic powder, onion powder, and Italian seasoning. Gently pry apart the bread pieces and drizzle the mixture over the loaf evenly, making sure to get in all the seams and cover all the pieces.
Wrap the bread up in the foil. Bake for 15 minutes.
Open up the foil, increase oven temperature to 425 degrees, and bake another 10 minutes until the cheese is melted and the bread is golden brown.
Let stand 5 minutes before serving, sprinkle with parsley and enjoy!
"Walk with the wise and become wise, for a companion of fools suffers harm." - Proverbs 13:20
Tuesday, November 11, 2014
Get Ready for the Holidays
Hey Everyone!
Thanksgiving is the perfect time for entertaining friends and family, getting together in your home is the perfect way to give thanks and show appreciation to those we love.
But, let's face it, we can get really stressed about making sure everyone, including ourselves enjoy the big day. So, I put together a list of Helpful Holiday Hints that I hope will allow you to diminish your stress level this season.
Just click on the "Good to Know" icon on the right side of my homepage, and there you'll find 10 ideas that I use every year to help make it a great holiday for all!
God bless you, this season, as you take time to give thanks and cherish the loved ones that surround your Thanksgiving table!
Saturday, November 8, 2014
Sweet Potato Casserole
One word describes this dish...yummy!
Thanksgiving is probably my favorite holiday because it's a time to reflect on all the blessings God has given us. It's pure family and friends time with the special people He's placed in our lives, many who have been by our side through good times and hard times. The Lord never leaves us, no matter what we endure, and is always there to lead the way through any storm that life may throw at us.
It's also a special day for us, food-wise! And I like to make my family's favorite holiday dishes. The turkey, in our home, is not the star...it's all the side dishes. This sweet potato casserole took center stage at our table quite a few years ago when I discovered a recipe that looked simply delicious!
Over time, I've made some changes that the family really loved best of all! I roasted the sweet potatoes, instead of boiled them and divided the milk into half milk and half Southern Butter Pecan Coffee Creamer (I think that's what took it to a new level.)
I've had to eliminate the chopped pecans due to family members with allergies, but it didn't change the great taste of the casserole at all.
Roasting the potatoes in the oven tastes totally different than boiling them. So, I've made some changes to the original recipe and ended up with a casserole that everyone raves about. Hope you'll try it and get "rave reviews" from the loved ones around your Thanksgiving table!
Ingredients:
4 cups sweet potatoes, roasted or microwaved, then cubed
1/4 cup white sugar
2 eggs, beaten
1/2 tsp. salt
4 Tbsp. butter, softened
1/4 cup milk
1/4 cup Southern Butter Pecan Coffee Creamer (secret ingredient)
1/2 tsp. vanilla
1 tsp. cinnamon
Dash of ground nutmeg and cloves
Topping: (I've been known to double this; make it ahead of time and store in a plastic bag until it's time to top the casserole)
1/2 cup brown sugar, packed
1/3 cup all-purpose flour
3 Tbsp. butter, softened
1/2 cup chopped pecans (optional)
Mini marshmallows (optional)
Preheat oven to 325'F. Grease or spray a 9x13" baking dish.
*Roast sweet potatoes in oven or microwave until soft and ready to peel and mash. Do not boil, this is so much easier!
In a large bowl, mix together the mashed sweet potatoes, white sugar, eggs, salt, butter, milk, creamer and vanilla extract. Mix until smooth. Transfer to a greased 9x13" baking dish.
In medium bowl, mix the brown sugar and flour. Cut in the butter with a fork, until the mixture is coarse. Stir in the pecans. (opt.) Sprinkle this mixture over the sweet potato mixture.
Bake in the preheated oven for 30 minutes or until the topping is lightly brown.
If you're adding the marshmallows, just spread them over the top and return to the oven for about 5 minutes or until they start to brown.
*Wash the sweet potatoes, wrap each in aluminum foil and bake in a 425'F. oven. Bake for 45 minutes or until a fork can easily pierce through to the middle.
Yields: 10-12 servings
Hint: When making food for a holiday, do all your prep work a 2-3 days in advance. For all my casseroles I mix them, pour into their baking dish and place an aluminum foil cover over it, where I've written the oven temperature and baking time for that dish. Into the fridge they go until it's time to bake them.
Be encouraged!
"Give thanks to the Lord, for He is good; His love endures forever." -1 Chronicles 16:34
Wednesday, November 5, 2014
Chocolate Pumpkin Muffins
Only two ingredients & 90 calories each!
Once in a while, a recipe comes along that's so easy you just think it's "too good to be true." This is one of those recipes!
My granddaughter is always looking for good recipes with great flavor and lower calories. In case I didn't mention it, she's lost over 120 lbs. Yes, I am so very proud of her! She's been working hard for over a year and is dedicated to better health for herself and her hubby.
Andrea found this on the WW page and it's our new favorite muffin. Not only are these muffins easy to make, they are so delicious, rich and super moist!
I gave one to my neighbor, who doesn't like pumpkin and he loved them. I almost felt guilty that I didn't tell him what was in it until after he ate it. He was shocked!
You may be tempted to add the eggs, oil, water according to the cake mix directions, but DON'T DO IT! I promise, you don't need any of it! Just look at that gorgeous muffin Andrea made...yours will be beautiful and delicious too!
If you're not a big chocolate fan, then try this with Duncan Hines Spice Cake Mix...delicious!
Ingredients:
1 box of Duncan Hines chocolate cake mix
1 (15 oz.) can of pumpkin puree (not pumpkin pie filling)
1 cup chocolate chips, regular or mini (if desired)
Preheat your oven to 350 degrees.
Dump ingredients into a large mixing bowl. Blend with a mixer for two minutes on medium speed or until well mixed. The batter will be thick. If desired, use a spatula to fold in chocolate chips. Use an ice cream scoop to spoon batter into lined or greased muffin tins. (Spray liners with Pam or the muffins will stick to the paper.)
Bake at 350 degrees for 18-22 minutes or until a toothpick comes out clean. Let muffins cool before removing from the muffin tins.
You may choose to top them with powdered sugar or frosting, but they really don't need anything.
"Christ honors our submission even when our only motivation is obedience." - Beth Moore
Saturday, November 1, 2014
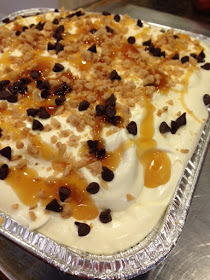
Better Than Anything Cake
The perfect gooey dessert!
This cake has been around since the early 2000's, but I have to confess, I found out about it just a few years ago.
I've made it three times already! Once for my family and twice for others who needed a scrumptious dessert for a special occasion. People just love this dessert, and it couldn't be easier to make!
I just finished making it for my son-in-law's birthday dessert. Mike loves chocolate and I love to surprise him with different desserts featuring some kind of chocolate, ooey-gooey deliciousness. I'm pretty positive this one will not disappoint!
Try it, you will definitely make an impression on your family and friends!
*Okay everyone, I'm adding a little "tag" to this post. I decided to make a frosting, instead of using just the Cool Whip...and it added a richness that was lost with frozen topping alone. It made a world of difference!
Ingredients:
1 box German chocolate, devil's food or yellow cake mix (baked according to box directions)
1 (14 oz.) can sweetened condensed milk
1 (8 oz.) jar caramel topping, room temperature
1 (8 oz.) container Cool Whip (thawed) *see tag below
1 (8 oz.) bag of chocolate covered toffee chips (or chopped up Skors bars)
Heat oven to 350°F (325°F for dark or nonstick pan). Make and bake cake as directed on box for 13x9-inch pan. Cool 15 minutes.
Poke top of warm cake every 1/2 inch with handle end of wooden spoon. (If cake sticks a bit, just clean off the handle and continue.)
Be encouraged!
I've made it three times already! Once for my family and twice for others who needed a scrumptious dessert for a special occasion. People just love this dessert, and it couldn't be easier to make!
I just finished making it for my son-in-law's birthday dessert. Mike loves chocolate and I love to surprise him with different desserts featuring some kind of chocolate, ooey-gooey deliciousness. I'm pretty positive this one will not disappoint!
Try it, you will definitely make an impression on your family and friends!
*Okay everyone, I'm adding a little "tag" to this post. I decided to make a frosting, instead of using just the Cool Whip...and it added a richness that was lost with frozen topping alone. It made a world of difference!
Ingredients:
1 box German chocolate, devil's food or yellow cake mix (baked according to box directions)
1 (14 oz.) can sweetened condensed milk
1 (8 oz.) jar caramel topping, room temperature
1 (8 oz.) container Cool Whip (thawed) *see tag below
1 (8 oz.) bag of chocolate covered toffee chips (or chopped up Skors bars)
Heat oven to 350°F (325°F for dark or nonstick pan). Make and bake cake as directed on box for 13x9-inch pan. Cool 15 minutes.
Poke top of warm cake every 1/2 inch with handle end of wooden spoon. (If cake sticks a bit, just clean off the handle and continue.)
Drizzle condensed milk evenly over top of cake; let stand until milk has been absorbed into cake.
Drizzle with 3/4 of the caramel topping. Run knife around sides of pan to loosen cake.
Cover and refrigerate overnight for best results.
Spread whipped topping over top of cake. Sprinkle with toffee bits, and drizzle with the rest of the caramel topping. Store covered in refrigerator.
*(Whip together 1 small pkg. of instant vanilla pudding, 1/4 cup confectioner's sugar, 1/2 tsp. vanilla and 1 cup milk. Then stir in the 8oz. container of Cool Whip.)
Be encouraged!
"And we know that all things work together for good to them that love God, to them who are the called according to his purpose." -Romans 8:28